Difference between revisions of "Setup assistant"
From TV-Browser Wiki
ClementSimon (talk | contribs) |
|||
| (69 intermediate revisions by 8 users not shown) | |||
| Line 1: | Line 1: | ||
| − | + | The '''setup assistant''' is started when you first start TV-Browser. It guides you through the most important settings like internet connection and channels. [http://www.jouercasino.eu/machine-a-sous machine a sous] | |
| − | + | You can start this assistant at any time using the menu '''Help -> Setup assistant...'''. | |
| − | |||
| − | + | ==The process== | |
| + | |||
| + | {|style="border: 1px solid white; width:600px; text-align:left;" | ||
| + | |- bgcolor=white | ||
| + | |[[Image:TV_Browser_2.5beta3_Setup_Assistant_1.jpg|thumb|Stage 1|150px|center]] | ||
| + | |[[Image:TV_Browser_2.5beta3_Setup_Assistant_2.jpg|thumb|Stage 2|150px|center]] | ||
| + | |-bgcolor=lightblue | ||
| + | |This is the first screen you will see after starting TV-Browser for the first time. | ||
| + | |The second screen is the network settings screen. It allows you to configure proxy servers and tests your internet connection. If you need to supply proxy settings, do so and click next. Otherwise, simply click next to continue. | ||
| + | |- bgcolor=white | ||
| + | |[[Image:TV_Browser_2.5beta3_Setup_Assistant_3a.jpg|thumb|Stage 3a|150px|center]] | ||
| + | |[[Image:TV_Browser_2.5beta3_Setup_Assistant_3b.jpg|thumb|Stage 3b|150px|center]] | ||
| + | |-bgcolor=lightblue | ||
| + | | If step 2 worked correctly this is the screen you will see. Click next to continue the process. | ||
| + | | If step 2 '''didn't''' work correctly, you will see this error message. The most likely reason for this is is a problem with your firewall. Possible solutions to firewall problems are [[Firewalls|given here]] | ||
| + | |- bgcolor=white | ||
| + | |[[Image:TV_Browser_2.5beta3_Setup_Assistant_4.jpg|thumb|Stage 4|150px|center]] | ||
| + | |[[Image:TV_Browser_2.5beta3_Setup_Assistant_5.jpg|thumb|Stage 5|150px|center]] | ||
| + | |-bgcolor=lightblue | ||
| + | | A number of status messages such as the one shown above will be displayed next. | ||
| + | | Next you will see this screen. This stage is described on [[Settings:Channels|the channels settings]] page. | ||
| + | |- bgcolor=white | ||
| + | |[[Image:TV_Browser_2.5beta3_Setup_Assistant_6.jpg|thumb|Stage 6|150px|center]] | ||
| + | |[[Image:TV_Browser_2.5beta3_Setup_Assistant_7.jpg|thumb|Stage 7|150px|center]] | ||
| + | |-bgcolor=lightblue | ||
| + | | In the next stage, you select if you want pictures of programs to be downloaded and displayed or not. This process is explained on the [[Settings:Picture| picture settings page]]. | ||
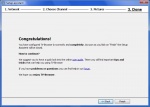
| + | | This is the final screen you will see as the setup assistant confirms that all your settings have been accepted. | ||
| + | |} | ||
| + | |||
| + | ==After the process finishes== | ||
| + | |||
| + | {|style="border: 1px solid white; width:600px; text-align:left;" | ||
| + | |- bgcolor=white | ||
| + | |[[Image:TV_Browser_2.5beta3_Setup_Assistant_8.jpg|thumb|Stage 8|150px|center]] | ||
| + | |[[Image:TV_Browser_2.5beta3_Setup_Assistant_9.jpg|thumb|Stage 9|150px|center]] | ||
| + | |-bgcolor=lightyellow | ||
| + | |After the Setup Assitant is complete you will see the above screen. Obviously, you will want to download some program data so click "Update now" | ||
| + | |Finally, choose how many days or weeks of data to download and click "Update now" for a second time. | ||
| + | |} | ||
[[de:Einrichtungsassistent]] | [[de:Einrichtungsassistent]] | ||
| + | |||
| + | [[category:Installation]] | ||
Latest revision as of 10:33, 24 June 2010
The setup assistant is started when you first start TV-Browser. It guides you through the most important settings like internet connection and channels. machine a sous
You can start this assistant at any time using the menu Help -> Setup assistant....
The process
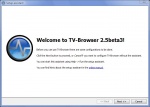
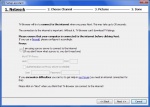
| This is the first screen you will see after starting TV-Browser for the first time. | The second screen is the network settings screen. It allows you to configure proxy servers and tests your internet connection. If you need to supply proxy settings, do so and click next. Otherwise, simply click next to continue. |
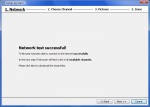
| If step 2 worked correctly this is the screen you will see. Click next to continue the process. | If step 2 didn't work correctly, you will see this error message. The most likely reason for this is is a problem with your firewall. Possible solutions to firewall problems are given here |
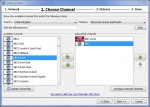
| A number of status messages such as the one shown above will be displayed next. | Next you will see this screen. This stage is described on the channels settings page. |
| In the next stage, you select if you want pictures of programs to be downloaded and displayed or not. This process is explained on the picture settings page. | This is the final screen you will see as the setup assistant confirms that all your settings have been accepted. |
After the process finishes
| After the Setup Assitant is complete you will see the above screen. Obviously, you will want to download some program data so click "Update now" | Finally, choose how many days or weeks of data to download and click "Update now" for a second time. |
